While many people think that strong fingers and good footwork is the key to becoming a solid climber, the truth is that being a good rock climber is about more than just moving well on the rock - to be a proficient climber, one needs to be able to belay.
A climber who can't belay brings little to a climbing partnership, so, especially for a newer climber, being able to belay might mean that others will be more keen to take you out for a day on the rock or in the gym. So learn the PLUS technique to make sure you can belay safley and efficiently.
Belaying is a skill, so it takes time and energy to become a proficient belayer. Although many people start climbing and take a learn-to-belay class either in a gym or outside, many people - both new climbers and seasoned vets, alike - make some grievous errors when tending the rope.
So, to help you out, we’ve compiled this introductory guide to belaying, complete with information about different belay devices and different belay methods for both top rope and lead belaying. Let’s get to it!
What Type of Belay Device Should I Use?
Belaying, for the vast majority of recreational climbers, involves the use of a belay device - a compact piece of metal and/or plastic that’s designed to add friction to the rope system so that the average belayer could catch a fall from the average climber.
Without a belay device to add friction to the system, one would have to rely solely on their own strength to hold up the complete weight of another human being.
With a belay device, a belayer holds just a fraction of a climber’s weight.
This concept is key in the world of belaying, particularly for people who belay people up to two times larger than themselves. Plus, when one considers the amount of force that is exerted just during a standard climbing fall, even the strongest among us benefit from a bit of friction.
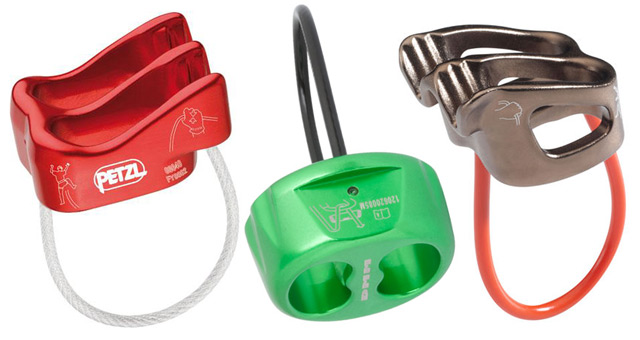
However, there are a whole lot of different belay devices out there, each with its own advantages and disadvantages. We’ll just briefly introduce the two most popular types of modern belay devices - tubular and assisted braking, if you want more info, do checkout our full guide to belay devices.
Tubular Belay Devices
Tubular belay devices are some of the most common belay devices out there because they’re both simple and affordable.
Tubular belay devices go by a wide variety of brand names, but some of the most popular are the Black Diamond ATC and the Petzl Reverso.
These belay devices are great for all kinds of climbing. For the most part, to use these devices, one must first fold and push the rope through one of the ‘tubes’ in the device and then clip the rope with a locking carabiner. Both the folding of the rope and the clipping of the carabiner add bends to the rope, which add friction to the overall system.
Ultimately, these are compact and light devices which can work with a wide range of rope diameters, including double and twin rope diameters. Plus, most (but not all) tubular belay devices have two ‘tubes’, which means they can also be used for double-rope rappelling.
The main downside to these devices is that they don’t offer any support in actively catching a fall, rather - one’s hands are solely responsible for gripping the rope tightly in the event of a fall or a hanging climber.
Assisted-Braking Belay Devices

Assisted-braking devices do exactly what one would think they do - they assist the belayer in catching a fall or holding a hanging climber. While they all have different mechanisms of action, the overall concept remains the same.
Assisted-braking devices come in many different models (the most popular being the Petzl GriGri and the Trango Cinch) but what’s important to remember is that they are NOT auto-locking - rather, a belayer always needs to maintain a firm grip on the brake strand of the rope, regardless of what kind of device they’re using.
The main benefit to an assisted braking device is that the can help stop a climber’s fall, especially if there’s a big weight disparity between the climber and the belayer.
It’s important to note, however, that assisted-braking devices don’t work with all rope diameters (they usually have trouble with those skinny strands and those beefy work ropes).
Plus, they usually only let you rappel off a single strand, so they’re not terribly popular in the alpine.
How to Use a Belay Device
Now that you know about the different kinds of belay devices that are available in today’s market, it’s time to talk about how to use a belay device.
Ultimately, the best way to use a belay device is according to the manufacturer’s specifications. While many people throw away the user manual that comes with all pieces of climbing equipment, when you buy a new belay device, it’s particularly important that you give this piece of paper a glance.
Every year, an unnecessary number of people get injured or killed as a result of the incorrect use of a belay device.
These accidents can be avoided or their severity can be reduced if we all take the time to read these manuals and receive proper instruction before using a new piece of climbing equipment - especially belay devices.
How to top rope belay
The ability to effectively top-rope belay is an important skill for any climber.
Like any new skill, top rope belaying will likely feel awkward and clunky until one gets used to it, but after a few dozen belays, most climbers find that the motions have become muscle memory.
Belaying starts with the proper fitting and putting-on of a harness - both for the climber and the belayer. While we won’t focus on the climber’s side of things here, it’s important to note that the belayer and climber are both responsible for doing pre-climb checks of each other’s harnesses and systems.
After one puts their harness on, the next step is to properly load the belay device according to the manufacturer’s specifications. Since each belay device is different, here, we will focus on the ATC belay device, which is popular among both new and seasoned climbers.
Top Rope Belay With an ATC belay device
Once the belayer has their harness on properly and the rope is flaked and ready to go, it’s time to load the belay device.
With an ATC, the first step is to bend the rope into what’s known as a “bight” - a curve in the rope that does not cross itself (if it did, it’d be called a loop!).
Then, the belayer takes this bight of rope and pushes it into one of the tubes of the ATC so that the bight of rope sits alongside the keeper strand protruding from the metal of the ATC.
Once this is done, the belayer clips both the keeper strand and the bight of rope with a locking carabiner. This carabiner will then be clipped and locked to the belay loop (NOT the tie-in points) of the belayer’s harness.
When attaching the belay device and carabiner to one’s harness, it’s important to ensure that the climber’s end of the rope (i.e. the end of the rope that goes up to the top-rope anchor and then back down to the climber) is coming out of the top of the belay device while the brake strand - the part that the belayer holds onto to arrest a fall - comes out of the bottom of the belay device.
After this is completed, climbers and belayers should go through a thorough check to ensure that the whole system is set up properly. This usually involves a visual and physical check of each other’s harness, knot, belay device, etc. to make sure that any errors, if they exist, are caught before the climber leaves the ground.
Then, climbing partners generally use a set of climbing commands to indicate that one is ready to climb and that the other partner is, indeed, ready to belay. These vary from person to person, but what’s important is that both you and your climbing partner are on the same page as to what a command means and what the proper response to is actually is.
Common Climbing Commands
| Command | Who | Meaning |
|---|---|---|
| On belay? | Climber | Asking if you are on belay |
| On belay, climb when ready | Belayer | You’re on belay and ok to start climbing |
| Climbing | Climber | I’m climbing, see ya later! |
| OK, climb | Belayer | Confirmation that climbing has begun |
| Up Rope | Climber | There’s too much slack in the system, take rope in |
| Slack | Climber | The rope is too tight, pay out some slack |
| Tension | Climber | Give me a tight rope, I’m feeling sketchy |
| Take | Climber | Take in and lock off the belay, get ready for a lob |
| Off Belay | Climber | I’m safe, you can take me off belay |
| Belay Off | Belayer | You are now off belay |
| On Rappel | Climber | I’m about to start rapelling |
| Rappel Off | Climber | I’m off the rapell rope |
| Below | Anybody | rock or other debrie falling, watch our below |
| Rope | Climber | Letting people know your about to throw the rope down |
| Clear | Belayer or others | It’s ok to drop the rope |
Now that the systems have been checked, the climber can climb and the belayer can belay. When using an ATC, one of the best methods to use is the PLUS method.
The PLUS Method of Belaying
PLUS stands for Pull/Punch, Lock, Under, Slide.
This name is an acronym to help belayers remember what they need to do to tend to the rope as a climber moves up a route. Before we even get to the actual belay motion, however, we need to discuss one of the most important parts of belaying - the brake position.
The foundation for any good belay technique is a good belay ‘brake’ position, which is the orientation of one’s hands when one is arresting a fall or when a climber is just simply not moving.
This is the belayer’s home base position and should be used whenever a climber is not actively moving up a route as it is the strongest position for the belayer. A good brake position looks like this:
- The belayer’s dominant hand is firmly gripping the brake strand (the part of the rope coming out of the bottom of the ATC)
- The belayer’s weaker hand sits just below the dominant hand on the brake strand
- Both the belayer’s hands are under the ATC and are close to the belayer’s body, creating a nice bend in the brake strand as it comes out of the ATC
- The belayer is in a comfortable, athletic stance, ready to catch a fall
Once a belayer has mastered the brake position, they’re ready to practice the PLUS belay movement. From the brake position, a belayer should do the following:
1. Pull/Punch
Move the weaker hand (for most people, it’s the left) up to the climber’s side of the rope (the part coming out of the top of the belay device) just around where one’s chin is.
As the climber moves up the route, the belayer should pull down with the weaker hand (known as the guide hand) and punch upwards with the dominant hand (known as the brake hand).
This motion should feed the rope through the belay device, but it usually takes some practice to make it smooth. The brake hand should move right back next to the body as soon as the pull/punch is finished.
2. Lock
After feeding some rope through the ATC, it’s important for the belayer to get back into brake position quickly, just in case there’s an unanticipated fall. We need to be careful as to how we do this, though, so that we always maintain a hand on the brake strand. If the brake hand is next to the body, below the ATC, then the device is ‘locked’.
3. Under
From this ‘locked’ position, the belayer moves the guide hand off the climber’s strand and down to the brake strand, just below the brake hand, being sure to properly grip the rope. Now, the belayer is in the brake position.
4. Slide
Now, the belayer slides the brake hand back up towards the ATC, being sure to leave at least 2-3 inches (5-7 cm) between the brake hand and the belay device. At this point, the belayer is ready to repeat the process, again and again, until the climber reaches the top of the route or decides that they no longer want to continue.
Getting the climber to the top of the route isn’t the end of a belayer’s role, however. Especially when top roping, it’s very likely that the belayer will also be responsible for lowering the climber back down to the ground.
How to Lower Someone Once they’re at the Top
Lowering may sound simple, but a sizeable number of incidents happen each year due to lowering mistakes. Taking the time to learn to lower someone properly is a key aspect of proficient rope handling.
To lower a climber properly using an ATC, the belayer should:
- Return to brake position, making sure that they have a firm grip on the rope.
- Keep both hands close to the body to maintain a constant bend in the rope as it comes out of the ATC.
- Maintain a firm grip with the guide hand (weaker hand) but slowly and slightly loosen the grip with the brake hand (dominant hand).
- Use the brake hand to feed rope into the ATC while maintaining a firm grip with the guide hand and keeping both hands fully below the ATC.
- Continue feeding rope into the ATC until the climber reaches the ground, being mindful of if the climber is moving over steep overhangs or around other obstacles, like trees and loose rock.
Once the climber is back on the ground, then the belayer’s task is complete.
Belaying might seem simple to experienced climbers, but it’s a lot to take in for someone new to the climbing world.
Learning to belay takes time and lots of practice and it’s particularly important that one learns to belay under the tutelage of a qualified and experienced climbing professional.
How to Lead Belay
Once a climber has mastered the art of toprope climbing and belaying, they often find themselves itching to learn how to lead climb and lead belay. Lead climbing and belaying are advanced skills best suited for experienced climbers who are looking to take on more challenging or longer climbs.
While lead belaying shares many similarities with toprope belaying, it is a different skill that warrants the time and attention necessary to practice make sure that one does everything properly.
Lead belaying and climbing also come with significantly more risk than toprope climbing, so perfect form and technique are essential for any new lead belayer.
Lead belaying begins very similarly to top rope belaying - both the climber and the belayer need to have the harnesses on properly.
The climber needs a properly tied knot attached to their tie-in points, and the belayer needs a properly loaded belay device attached to their belay loop.
Although every belay device is different, we’ll focus here on the use of an ATC to lead belay.
Lead Belay With an ATC Belay Device
To lead belay with an ATC, a belayer loads the ATC as they normally would for top roping.
The first time someone loads an ATC for lead belaying, they might be confused by how the device ought to be oriented, but it’s important to remember that the climber’s side of the rope (i.e. the end of the rope going to the climber) needs to come out of the top of the belay device) while the brake strand of the rope needs to come out of the bottom of the device.
This can be a bit tricky at first for a new belayer to figure out as the climber’s end of the rope does not first run up to an anchor, which makes identification easy.
Once the belay device is set up properly, both the climber’s and the belayer’s pre-climb checks are complete and all climbing commands are said, the climber can get on the wall.
Unlike toprope belaying, however, the lead belayer is not solely focused on taking in slack in the rope as the climber moves up a route. Since the lead climber and their rope both start on the ground, the lead climber must clip into protection as they move up the route.
Moreover, since the lead climber does not start the route attached to any fixed anchor point, the climber is not technically ‘on belay’ until they clip their first piece of protection.
Depending on the situation, some belayers might want to spot the lead climber to this point. That being said, even though the climber is not yet ‘on belay’, the belayer must be ready and available to tend to the climber as soon as they leave the ground.
As a lead climber moves up the wall, the lead belayer must be prepared to both give and take slack. Lead belaying is much more dynamic than toprope belaying because of the need to feed slack when the climber moves up the wall or clips and also to take in and manage slack so that the climber isn’t exposed to a larger fall than absolutely necessary.
Feeding slack through an ATC while lead belaying, although a simple concept, actually takes skill and practice to perform smoothly and without ill effect on the lead climber.
To feed slack out, the lead belayer begins in the ‘brake position’ and does the following:
- Holds the ‘climber’s’ end of the rope with the guide hand and the brake strand with the brake hand
- Feeds the rope upward with the guide hand while simultaneously feeding the rope through the belay device using the brake hand
- Slides the brake hand back down the brake strand and moves the guide hand back down toward the belay device
- Repeats the motion to continuously feed slack to the climber
Even though a lead climber is consistently moving up a route, the belayer may still need to take in slack. This process is exactly like how a toprope belayer would take in slack as a toprope climber moves up a route.
The lead belayer should use the PLUS method to ensure that the rope is in the brake position as much as possible throughout the belay motion.
Although both feeding and taking slack may seem simple, the real trick to lead belaying is to be able to switch between both motions easily and effectively so that the lead climber feels little to no resistance as they move up a route. This is a skill that takes time to develop, especially when one considers all of the other things that a lead belayer must pay attention to throughout a route.
One of the most important responsibilities of a lead belayer is to monitor rope slack as a climber climbs. This is done primarily by taking and giving slack appropriately as the climber moves and involves constant vigilance on the part of the belayer.
For a lead belayer, this responsibility is of the utmost importance as the lead climber is exposed to more serious falls if there is too much or too little slack in the system.
With too much slack, the climber may take a longer fall, which could cause them to hit the ground or a ledge well below them. Too little slack means that a lead climber could take a much harder fall, which could have serious implications if the climber has had to place marginal protection or if the rock quality is poor.
One of the best ways to monitor the slack in a lead climbing system is to pay attention to the rope that is coming out of the belay device. The rope coming out of the top of the device (i.e. the climber’s end) should have a slight bend to it but should not drop below the device.
If the rope is perfectly straight or hangs below the belay device, then the belayer has either too little or too much slack, respectively.
The lead belayer must consistently assess the slack in the system as the climber moves, being sure to take into account the possibility of a ground fall at the beginning of the climb, when it may be more prudent to slightly reduce the amount of slack in the system.
Ultimately, any type of belaying is an advanced skill and requires significant practice and guidance to perform appropriately. We recommend that you always seek out qualified instruction before belaying either top rope or leadfor the first time.