
The adventure is not over when you top out on a climb. Sure, you may have completed your upward journey for the day, but you are by no means done with the climb - the uphill is only half the battle.
Once you top out on a climb, you have a number of options for your descent. Depending on where you are, you might walk off your climb down a trail or climber’s path, down-climb a short scramble, or choose to rappel/abseil off your route.
Many climbers prefer to rappel while others try to avoid it at all costs.
Unfortunately for those of us who aren’t terribly keen on rappelling, we are sometimes left with no other option. Thus, it’s important to learn how to do it properly and effectively.
That being said, rappelling is by no means a risk-free activity. Like climbing, rappelling has its own set of dangers that need to be managed appropriately.
Unfortunately, many people become complacent with their rappelling technique over time, particularly when the rappel comes at the end of a very long day of sending.
Ultimately, we recommend extending your rappel and using an autoblock backup below the belay device. However, there are pros and cons to each backup technique, so it’s important to understand each method’s benefits and limitations before trying it out at the crag.
The need for rappel backups
While rappelling techniques are not hard to master, they are critically important to get right. Every year, a number of climbers lose their lives prematurely due to rappelling-related accidents.
Rappelling off the end of one’s rope, rappelling too quickly and losing control, and improper simul-rappelling are all frequently cited reasons for death or injury in climbing accidents
Although some climbing injuries and fatalities can’t be avoided using reasonable risk management techniques (think massive rockfall off of El Cap), many of these incidents can be avoided through good technique, particularly when it comes to rappelling.
One of the best ways to reduce the likelihood of a rappelling-related incident is to use a rappel backup, such as the prusik, autoblock, or klemheist.
By using a backup, you effectively create a ‘third hand’ on the rope using a sling in the form of a friction hitch, which can act as an extra measure of security should you accidentally let go of the rope on your descent.
Many people choose not to use a backup for various reasons, generally because they think it will save time or be less effort, when, in fact, setting up a rappel back up generally only takes a minute or two.
This seems like time well spent when you consider the benefits of a rappel backup and the consequences of a botched rappel.
Of course, we can never totally eliminate the risks associated with any climbing-type activity, but there are things we can do - like use rappel backups - that mitigate these hazards.
But, as with anything in climbing, there is considerable debate over what kinds of rappel backups to use and how they should be used. To help you out, we’ll discuss the three main forms of rappel backups and their various advantages and disadvantages.
Rappel backup basics
Backup above the rappel device
Before deciding on which backup you’d like to use for your rappel, it’s important to first cover some foundational information.
First things first, we ought to discuss whether or not the backup goes above or below the rappel device. This is a source of some contention amongst a handful of climbers, as there are benefits and disadvantages to both methods.
When you rig a backup above your rappel device, you have the benefit of being able to hang off of the backup and unweight the rappel device. This can be useful when you need to pass a knot (a more advanced skill) but doing this needs some care as you never want to hang off of just your backup.
Additionally, when your back up is above your rappel device, you don’t have to worry about it becoming jammed in the device, which renders the backup useless. Plus, there is no need to extend the rappel device using a sling so that it sits farther away from your harness.
However, rigging above the device has a number of serious disadvantages. First, there is the danger that your backup is too long and thus can be out of reach when you are hanging on the rope. This can be avoided by being mindful of the length of your sling.
Another disadvantage of the above the device rigging system is that you must keep one hand above the belay device to tend to the backup.
This might not seem like a big deal, but it does mean that you only have one hand on the brake strand of the rope. Sure, you’re backup is there to catch you, but it’s best to keep both hands on the brake strand whenever possible.
Backup below the rappel device
Rigging below the device, on the other hand, offers a number of benefits. The primary benefit of this system is that it keeps both your hands on the brake strand of the rope, which, as we mentioned earlier, is important.
When rigging below the device, however, you must be conscientious of how long your back up is as if it is too long, it can jam into the rappel device and become useless. This can be remedied by extending your rappel device away from your harness using a sling. Extending your rappel is a great method with a number of different benefits which are too numerous to describe here.
While extending your rappel is a recommended and common technique for rigging below the device, another common method - clipping the backup into your leg loop takes some special care.
Although clipping your backup to your leg loop is a somewhat popular technique it is one that should be used with caution. Many leg loops are not designed to be loaded in this manner and this can cause the leg loop to loosen or come apart.
More importantly, however, when you clip into your leg loop, you give yourself a false idea of how short your backup actually is and expose yourself to an accidental jamming of the back up into the rappel device.
This can happen when you inadvertently lean one way and your leg lifts up, thereby bringing the backup closer to the rappel device than you would want.
For this reason, we recommend rigging below the device with an extended rappel. Other methods can be used but require extra attention and caution.
Now that you have a thorough foundational understanding of the basics of backing up a rappel, let’s take a look at the three most common friction hitches used in rappel backups.
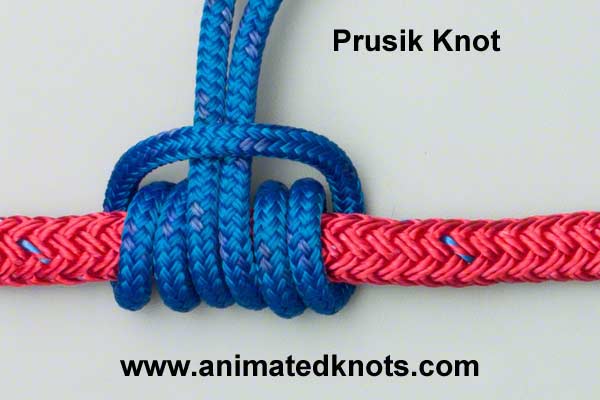
Prusik rappel backup
Like the other two methods discussed here, the prusik is a friction hitch, which means that it works by applying friction to the rope. This friction causes the prusik to ‘grab’ the rope and effectively stop your downward movement.
All of these friction hitches are incredibly versatile techniques that can be used in a variety of climbing and self-rescue scenarios, so they’re great to learn.
The prusik is exceptionally good at creating friction, which is good in a rappel situation, but it has some limitations. The downside of creating so much friction is that the prusik is nearly impossible to loosen when fully weighted.
This might seem like a good thing when it is holding you up, but it can cause problems when you’re in the middle of a hanging rappel and your prusik catches and gets fully weighted.
Basically, at this point, you’re stuck. Not good.
That being said, it’s a useful friction hitch that works well in a variety of situations and is worth learning. We just don’t recommend it whenever there’s a chance that you might be free-hanging and unable to weight the rope during a rappel.
One final note on the prusik: We only recommend using cord - not - webbing when making this friction hitch. Webbing does not work well with a prusik, so if you’d like to use webbing, you should use either the autoblock or the kleimheist instead.
Autoblock rappel backup
The autoblock is a particularly popular rappel backup because it is very quick to set up. Plus, you can generally loosen an autoblock even when it’s loaded.

The main downside to the autoblock is that it creates less friction than either the prusik or the kleimheist. This can be remedied by adding more ‘wraps’ of the autoblock around your rappel ropes and by checking your autoblock’s ability to ‘grab’ the rope before you start your rappel.
This ‘preflight check’ is something that should be done with any backup and should be a part of your rappel check before you start your descent. However, this is something that is particularly important to note with the autoblock.
Regardless, the autoblock is a quick, simple, and easy-to-use rappel backup when done properly.
Klemheist rappel backup
The klemheist is yet another great rappel back up, especially for people using webbing slings, for which it works particularly well.

The main disadvantage of the klemheist is that it is a ‘unidirectional’ hitch, which means that it is really only effective when loaded in one direction. This is not much of a problem when it comes to backing up a rappel as you’ll be moving in one direction (down, that is).
However, this is something that’s important to note as this limitation can deter you from using a klemheist in some other scenarios, particularly in rescue rigging, which is beyond the scope of this post.
The klemheist is an effective rappel back up that provides a lot of friction can be loosened while weighted, so it is a good option for rappelling.
In conclusion
At the end of the day, each of these rappel back ups can be useful in a number of scenarios.
What’s important is that you learn to tie them and use them properly and with caution. Making a mistake with your backup can be as bad as making a mistake with your rappel, so as with anything in climbing, practice, and a keen eye for detail are important!